Saturday, April 10, 2010

Getting Started

Getting Started with Glogster

Glogster is a great educational tool and edu.glogster is even more useful, as it is geared towards being used in the classroom setting, by students and teachers especially. The first thing you do, then, when going to create a glog is to go to the website:

Now you can register for an account, its really your typical registration that you have probably done several times before, and start created you glogs or you can simply scroll down the page and get started working on your glog. You do not have to be registered in order to create a glog but I do recommend registering as there are several perks that come with, including having access to your "Dashboard" where all you glogs are saved,


being able to find other glogs, being able to invite others, make friends, comment on other glogs and gain points towards...something. With edu.glogster you can create a virtual classroom or simply create a normal glog but having access to all of the special edu material.

Friday, April 9, 2010

Step 1: Getting a blank slate


So once you start your glog in glogger you come to a start screen, a rather generic already designed glog that informs you about some of the things you can do with glogger, add things and subtract things, including what is shown on the screen. I usually start by taking the advice and deleting everything by hovering over each element so that there is a silver box [which you can see around the sticker] and clicking the red trashcan to delete an item.

In deleting each of the items, the title, sticker, text box and graphic, you will be left with a blank slate and only the glogger tool, or the black box with buttons that you can click to open a box with various different elements to choose from.

Thursday, April 8, 2010

Step 2: Designing - Adding the background


Glog and Page Walls

So once you have your blank slate, the next thing you can do is change the background of the glog to suit you needs, sometimes graph paper just doesn't fit with a given theme.


So, using the black tool box, which I labeled the "Glog Tool".

You can
change the background of the glog by going to the bottom button on the tool box, "wall" and basically choosing a background, you are given several already loaded options or you can upload a picture of your own or a picture from a link on the internet. As you can see in the image in the top left of the window under the tab "glog wall" you can choose the "Gallery", "My Pictures" or "Solid Color". The "Gallery" has already loaded backgrounds of various images and the "Solid Color" has the option for you to simply choose a single color as the background. The "My Pictures" however, is a bit different as you will see:


The "Upload" button allows you to
choose a picture from your pictures on your computer, the "Link" button allows you to find an image on the internet and past the link and the glog will download the picture from the link, and the "Grab" button will allow you to take a picture using your webcam if you have one. You can will see these option again for adding pictures and videos so keep them in mind.

Once you have chosen a background for your glog wall you might want to add a page wall. It is only an option, the page wall only shows up when viewing the finished glog on the webpage, it disappears when you go to print, embed or show the glog elsewhere. The process for adding a page wall is the same as adding the glog wall, you just go to the tab, in the "wall" section of the "Glog Tool" labeled the "Page Wall" next to the tab for the "Glog Wall."

Wednesday, April 7, 2010

Step 3: Designing the Glog: Adding Text


Adding Titles or Text

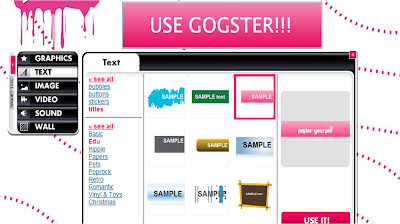
Well the most basic thing that you can do in glogster after you have added a background is to add text. You can do this by going to the "Glog Tool" and clicking the "TEXT" button, which will make the Text screen pop up. Now, there are several different forms to the text you can add. You can see these in the top section on the left of the screen, "bubbles," "stickers," and "titles." I will start with titles first because I usually like to give my glog a title in the traditional sense of the word but titles can be used in anyway you want to use them, to drop in text somewhere, give a picture a title, section off the glog, or anything you can think of for titles.

So, if you click on the "titles" link on the left hand side of the screen it will bring up the glogster database of titles, not just text but various kinds of title backgrounds, shapes and colorings to make titles pop out. You can search the entire database or search it by theme. In edu.glogster there is an additional theme titled EDU for educational-type titles.

You can also add text via "bubbles" which are really just shapes in different colors that are like speech bubbles that you can add to the glog to give your glog a bit of voice, such as attaching it to images or videos to add comments. It is really up to your creativity and how you want to use them but there are various kinds of "bubbles" in different themes.

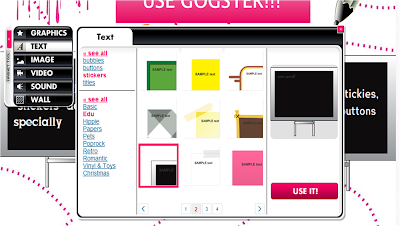
One thing that I am really excited to get to is adding text or body. I always add text to my posters, I usually use posters in order to get some message across. Anyway, you can add text either on it's own or specifically on a "sticker," like a sticky note. Personally, I prefer to use "stickers" because it makes the text pop but it's up to you how you add your text. To add text normally simply make sure you are on the homepage of the "Text" tab, which you can get to by clicking the "see all" link, and there is a button that simply says text. You can do this for titles as well. However, I like to use the "stickers," which you can use by clicking the link and then searching for a sticker that fits. You can search the entire database or by theme, like with many types of media, edu.glogster has a special section for educational-type stickers like blackboards and stationary stickers.

Once your text, in whichever form you choose, is published to your glog you can drag it to where you want it to be. You have the option of editing your text. Click on the text and click on the edit button on the bar at the top right corner. See a previous post if you would like to learn how to use the edit bar.

Glogster has a lot of options for adding text to your glog. You can usually find something to suit your needs and if you cannot you can always add an image and place text onto it thereby making it a sticker. Learn how to add images next.

Tuesday, April 6, 2010

Step 3: Designing the Glog: Adding Images


Adding Images


One type of media that you can add is images, or pictures. Simply go to the "IMAGE" tab on the "Glog Tool" and you will be confronted with two options. You can choose the "My Pictures" link on the left of the screen which will lead you to a screen where you can choose to upload pictures from your computer, load pictures from a website [google images is great for this] or grab a picture from your webcam. You also have the option of browsing the "tinypics" database, which is a database that you can access through glogster that you can search for images based on keywords and then use one the you find.


Before you click the "Use It" button to add the image to your glog, consider adding a frame for your picture. Once you have chosen an image you have the option of "Add a Frame," a button located above the "Use It" button. This will take you to the "Frames" tab in the "IMAGE" section of the "Glog Tool" where you can choose a frame, either from the entire database of frames or from specific categories or themes that the database is divided into. Once you have a frame, if you want it, you can publish your image to your glog by clicking on the "Use It" button.

Once the image is published you have the option of changing certain aspects of it using the edit bar. See a previous posting on how to use the edit bar if you are curious but keep in mind that you can change colors of things if they do not fit to a theme.

Saturday, April 3, 2010

Step 3: Designing the Glog: Adding Decoration

A poster is often made more interesting by the supporting decoration that is included with all of the content. Decorations, or graphics, can fill space, add to the theme, look cool and connect certain types of media, they are also great for adding links to the glog.

Anyway, you can add decorations by first going to the 'Magnet Tool' to the top button called "Graphics" which will open a window with all of the different kinds of graphics that you can add.


The graphics are preloaded and sorted into categories but I encourage searching all if you do not have anything specific in mind, you never know what you will find in different categories. Simply chose a graphic and click the "Use It!" button to publish the graphic to your glog. Like other types of media the edu.glogster has a specific section of graphics that are only on the edu version. In the edu version there are academic themed graphics, including some for specific content areas such as math and science.

Also, don't be turned off by the color or size, those are two things that you can change through the edit bar after you have published the graphic. If you are interested you can learn how to use the edit bar in a different blog.

Friday, April 2, 2010

Step 3: Designing the Glog: Adding Audio

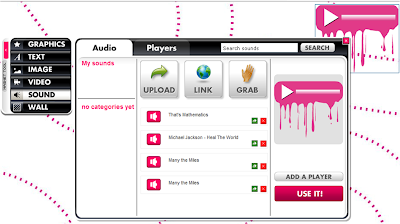
One type of media that can be utilized in a glog is audio, be it music or narration. All you have to do is go over to the 'magnet tool' and click the sound button. This causes a window to pop up showing your audio options. Now, there really isn't any audio preloaded, unfortunately, like other media can be but you do have the option of uploading audio from you computer, getting it from a url link or 'grab'-bing it, which is how you can do narration yourself as it utilizes a microphone connected to your computer and allows you to record sound.


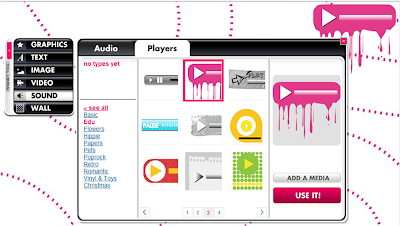
Before you click the "Use It!" button remember that you have the option of adding a player to your audio. If you chose not to add a player the audio will show up simply as a small round button with a play or pause sign depending on if the audio is playing or not. Anyway, click the "Add A Player' button and you will be redirected to a window with all sorts of audio players that you can add.

Once you have chosen your player, whichever one suits your glog, you can click the "Use It!" button and the audio will be published to your glog.

Remember that you have the option of editing your audio, if you haven't already you can learn how to use the edit bar by viewing a previous blog [or clicking the link]. However, know that with audio you have the option of having it play automatically when the glog is loaded or having it play only when clicked, you can get to this option through the fx button on the edit bar.

Thursday, April 1, 2010

Step 3: Designing the Glog: Adding Videos


Adding Videos


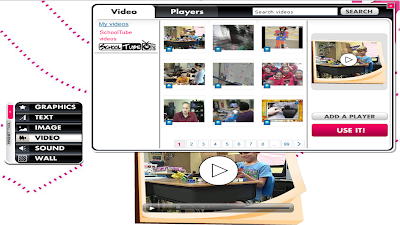
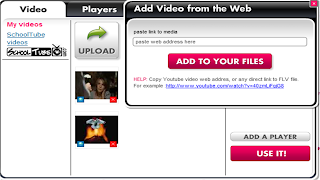
Text and images are not the only options for designing your glog. You can also add videos from various kinds of sources, from your own files or from video websites. The first step to adding a video is going to the "VIDEO" tab on the "Glog Tool" and you will see the image above. By going to the "My videos" tab on the left-hand side of the screen you will see the upload buttons.

You can either upload a file from your computer or you can add a video from the web. Adding a video from the web is made fairly simple. All you have to do is find a video, say on YouTube or some other video site, copy the URL and paste it into the area provided. Then click the "Add to Your Files" button. This will cause the file to be uploaded to glogster so that you can use it on your glog.

Just to note, if you are planning on using edu.glogster there is an added feature, which can be seen in the image above. You have the option of searching for videos on SchoolTube right from the "VIDEO" screen through glogster. It is a really great option to have in order to find videos to add to your glog, whether it is supposed to be educational or not. For this option, simply click on the link for SchoolTube on the left of the screen and and in the top right corner of the screen you will see a search bar which you can put terms into in order to search the SchoolTube database.

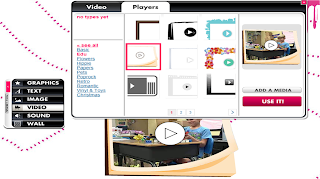
Before you click the "Use It" button consider first adding a player for the video. Adding a player simply means adding a border for the video and controlling how the video will be played.

Simply click on the tab next to the "Video" tab under "VIDEO" that says players OR click the "Add Player" button after you have chosen a video. The "Add Player" button will let you choose a player to add to the media you have already chosen while going to the tab will let you choose a player first and then "Add Media."

Once you click the "Use It" button after you have chosen your video and player, if you want to add it, you video will show up in the middle of the glog. You can move the video wherever you want to by simply dragging it to the destination.

However, you can also change the settings by clicking the edit button on the top right of the video.

See the posting on using the edit bar to see what you can do with it.
However, know that with video you have the option of having it play automatically when the glog is loaded or having it play only when clicked, you can get to this option through the fx button on the second edit bar.

Videos are just one type of media that can be included in your electronic poster.

Monday, March 22, 2010

Step 3: Designing the Glog - Using the Edit Bar


Once any sort of media is published to your glog it will show up in the middle of the glog and you can drag it to where you want it to be. You have the option of editing your media, be it a picture, video, graphic or audio player. Simply click on the media then click on the edit button that appears on the bar at the top right corner. You also have the option of deleting the media by clicking the trash button, the backspace button will not delete it. The edit button will not allow you to actually do anything to the image, like crop it, video or audio but it will cause another bar to pop up.

The edit bar you see to the right is what will allow you to change some aspects of the media, the frame for the pictures and videos or the audio player for music. By clicking the color button you can change the color of the frame, player or graphic if you want to, though sometimes media takes color in a weird way, like painting particle board. The color of an image or video will not change, just to let you know, but you can change the color of the frames if you do not like them or they does not fit with the frame, so do not be turned off by the color when looking for a frame.

You can also add a link to the media, sort of like a hyperlink, so that when someone is viewing the glog they can click the media and be redirected to a different webpage. Linking is especially useful for educational glogs as you can link a picture instead of cluttering the glog with a lot of text. It can also act as a sort of exploration for the viewers, though they will be helped by by circles that pop up when they scroll over a linked image or graphic.

If there is text you can also change that by clicking the "Ab1" button, which will let you change the color, type and size of the text. It's pretty nifty for keeping everything in a certain theme or style. You can also explore changing the effects of the media with the "fx" button. It allows you to change the shadows of the media if you wish it to have a shadow of a specific depth or color. It can also be used to make a cool glow surround your media if you choose a color light enough.

Sunday, March 21, 2010

Step 4: Saving/Publishing Your Post

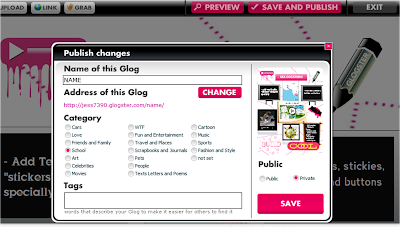
During the process of making your glog you are welcome to save it. In order to save it you have to "publish" your blog but by setting the glog to private no one but you can view it so you can come back and edit it while not showing an unfinished product. You save the glog in the same way that you would publish it, by going to the top or the bottom of the glog page and click the button "save and publish."


When you click the button a window will open that will allow you to name your glog. If you do not name it then the name will be set to a default name but you can change it later in editing. You will also be given the option of putting you glog into a category, from 'school' to 'love' to 'not set.' Once you have chosen a category you can go to the right hand of the window and set whether the glog should be public or private, if you set it to public then any glogster user will be able to view it so keep that in mind. If you are just saving the glog make sure to set it to private until you have it to a point where you want others to see it. Also note that you do not have to set it to public. You can set it to private and let others see it by providing the link or embedding it into an appropriate site.

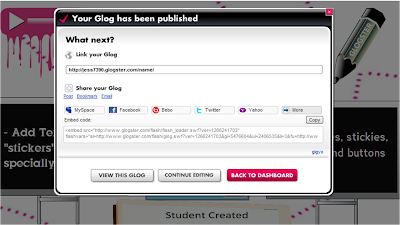
Click the "Save" button and you will be directed to the next, and final, window:


At this point your glog has been published and this screen gives you the option of copying the link or embed code to you glog in order to share it. Glogster also has a good relationship with several popular social networking sites, including twitter and facebook, so you can share your glog on those sites if you are a member. You are given the option, at the end, to view the glog, continue editing or going back to your dashboard so that you can view all of your work.

Saturday, March 20, 2010

What you can use glogster for, in the classroom.

There are many different kinds of blogs that you can make, or rather have your students make if you are a teacher and are using edu.glogster.

You can make a glog to represent who you are, use pictures, words, descriptions and the such to visually represent who you are to another person. This would be a great introduction activity for students to introduce themselves in a new class.

You can also make instructional glogs if you want to teach something, using pictures, steps, tutorial or supporting videos and the such. Instructional glogs would be a great new way to present information to students, as an introduction to the material or as a review of the material. You can even have students make them as a review of the material, it would be a great way to reinforce the material for them, finding supportive pictures and videos.

What glogs would seem most useful for, though, is a visual presentation tool for the students to present certain material, perhaps as something to do in a project, group or individual. You can even have the students make a commercial glog in order to sell something, which is a great activity for many content areas.

Thursday, March 18, 2010

Video: Discovery Education on edu.Glogster

Monday, March 15, 2010

The Finished Product

Wednesday, March 10, 2010

Sample Glog 1 - That's Mathematics


Tuesday, March 9, 2010

Sample Glog 2 - What if...?

Monday, March 8, 2010

Sample Glog 3 - Who I Am